


Introduction
Throughout the two previous parts, we've learned how to setup a very basic RESTful API from scratch, and tested this API locally in a very simple example. In this post, we're going to integrate this API with MongoDB Atlas, and use mongoose to manipulate our database collection by fetching, editing, and deleting some data. Fist step is to open your project with your favorite code editor (VS code in my case). You can download the source code from the previous part by cloning/downloading this repo. Or Download Full project by cloning/downloading this repo.
Adding new packages
First of all, let's add some new packages we're going to use in our project. Open up the terminal, and make sure you're in the root directory of your project, then run the following script:
npm i dotenv mongoose
The first package (dotenv) is used to add environment variables in our project. The second package (mongoose) is just a JS library that creates a connection between MongoDB and the Express web app framework fluently.
File Structure
Our next step is to create an intuitive, easy-to-use file structure for our project. This step is vital for the long-term life of your project for many reasons. For starters, a messy structure and code often leads to critical issues in the future. However, a good file structure helps us not only write cleaner and readable code, but also avoid repetition by writing reusable pieces of code across our app, in addition to ability to add new features and blocks of code (middleware) without disrupting any existing code.
Let's take a look at the structure I'm initially going to follow:
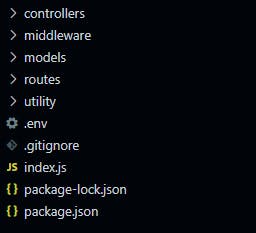
Each folder serves its unique purpose:
Routes folder contains each route file for our project
Controllers folder contains the logic that each specific route performs
Models folder containing all the models created (each model is an instance f a document). Models are responsible for creating and reading documents from the underlying MongoDB database
Middleware folder contains each middleware function we may for specific routes
Utils folder contains useful utility functions
.env file which contains all environment variables we're going to use
Signing up with MongoDB Atlas
Next, we're going to (sign up here) in order to integrate our API with mongoDB Atlas services. After signing up, follow the steps below:
- Choose the Shared Cluster option (free tier option), and click 'Create Cluster'
- Add a username and password under the 'How would you like to authenticate your connection?' option and click 'Add user'. Make sure to save those credentials to use later
- Add an IP address to access the project. For now, just add 0.0.0.0 and click 'Add Entry'
- After finishing all the above steps, click 'Finish and Close' on the bottom. Note that creating a cluster would take about 3-5 mins
- Next, click on connect button -> Connect your application -> Copy the connection string provided

6. Open .env file which we created earlier, and add the following (Make sure to replace yourusername and <password> with your actual credentials):
MONGO_URL = mongodb+srv://yourusername:<password>@cluster0.yv.mongodb.net/myFirstDatabase?retryWrites=true&w=majority
Creating a monogoDB connection
After setting up our cluster, we're going to connect to it right from our application.
First create a new file inside Utils folder called connectDB.js then navigate inside the file and add the following helper function:
import mongoose from "mongoose"

const options = {
    useUnifiedTopology: true,
    useNewUrlParser: true,
}

const connectDb = () => {
    if (mongoose.connections[0].readyState) {
        console.log("MongoDB already connected")
        return
    }
    return mongoose.connect(process.env.MONGO_URL, options, () => {
        console.log("Connected successfully to the DB!")
    })
}

export default connectDb
Modifying index.js
Next, we'll modify our index.js file as follows:
import express from "express"
import cors from "cors"
import helmet from "helmet"
import msgsRoute from "./routes/msgs.js"
import dotenv from "dotenv"
import connectDb from "./utility/connectDb.js"

const app = express()
const port = process.env.PORT || 5000

const corsOptions = {
    origin: "*",
    "Access-Control-Allow-Origin": true,
    optionSuccessStatus: 200,
}

app.use(cors(corsOptions))
app.use(express.urlencoded({ extended: false }))
app.use(express.json())
app.use(helmet())

dotenv.config()
connectDb()

app.use("/msgs", msgsRoute)

app.get("/", (req, res) => {
    res.send("Welcome to our RESTful API!")
})

app.use((req, res, next) => {
    const error = new Error("Something went wrong")
    error.status = 404
    next(error)
})
app.use((error, req, res, next) => {
    res.status(error.status || 500)
    res.json({
        error: {
            message: error.message,
        },
    })
})

app.listen(port, (err) => {
    if (err) throw new Error("Error while connecting to the server")
    console.log(`Server is live and running at: http://localhost:${port}`)
})

export default app
The only changes we've made from our setup in part-2 are:
- imported the dotenv package at the top, then called config() method on it (after app initialization)
- imported our newly created helper function (connectDb) used to connect to our mongodb cluster, then called this function (after app initialization)
Creating our first Model
As mentioned before, models are responsible for creating and reading documents from the underlying MongoDB database. For example, most database collections contains a User model, which basically resembles an object containing some useful data about a user (name, email, password, bio, age, etc...).
Lets create a Message model by first creating a file called message.js inside models folder, then add the following to the file:
import mongoose from "mongoose"

const messageSchema = new mongoose.Schema(
 {
  content: {
   type: String,
   required: [true, "Please provide message content"],
  },
 },
 {
  timestamps: true,
 }
)

const Dataset = mongoose.models.message || mongoose.model("message", messageSchema)

export default Dataset
Modifying msgs route
In the previous part, we created a msgs route in the routes folder which gathers all http methods related to msgs collection. Let's edit this file:
import express from "express"
import { addMsg, deleteMsg, getMsgs, updateMsg } from "../controllers/msgs.js"

const router = express.Router()

router.get("/", getMsgs)
router.post("/", addMsg)
router.put("/:msgId", updateMsg)
router.delete("/:msgId", deleteMsg)

export default router
In the above modification, we've separated the logic of each http method (GET, POST, PUT, DELETE) by importing new helper functions created in a new separate controller file, which resides inside the controllers folder. So let's navigate to this newly created file and add the following:
import Message from "../models/message.js"

export const getMsgs = async (req, res) => {
    try {
        const msgs = await Message.find()

        res.status(201).json(msgs)
    } catch (error) {
        res.status(500).json({
            msg: error,
        })
    }
}

export const addMsg = async (req, res) => {
    try {
        const newMsg = await Message.create({ content: req.body.content })
        res.status(201).json(newMsg)
    } catch (error) {
        res.status(500).json({
            msg: error,
        })
    }
}

export const updateMsg = async (req, res) => {
    try {
        await Message.findByIdAndUpdate(
            req.params.msgId,
            { $set: req.body },
            {
                new: true,
            }
        )
        res.status(200).json("Message has been updated successfully!")
    } catch (error) {
        res.status(500).json({
            msg: error,
        })
    }
}

export const deleteMsg = async (req, res) => {
    try {
        let msg = await Message.findById(req.params.msgId)

        if (!msg)
            return res.status(404).json({
                msg: "msg Not Found",
            })

        await msg.remove()

        res.status(200).json("Msg has been deleted successfully!")
    } catch (err) {
        res.status(500).json({
            msg: error,
        })
    }
}
Testing the newly created endpoints
After adding the functions above, we're ready to start our server in order to test our endpoints. Open up your terminal, and run the following script:
npm run start-dev
Now that our server is live, let's open up Thunder client, or your favorite API testing tool, such as postman to test our newly created endpoints.
Post request
Our first test would be posting a new message to our database since its still empty.
Lets add our endpoint at the top, change the http method to POST on the left, click on the body tab, pick raw JSON option, and add the following JSON object:
{
    "content": "Hey there my great friends!"
}
Then click on the send button to add our message model to our database collection. The process would look something like this:

The response we'll get back would look something like this:
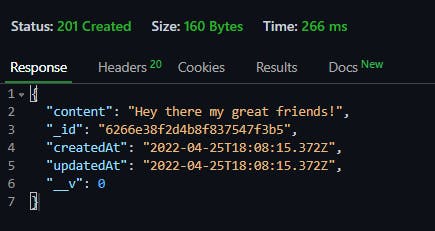
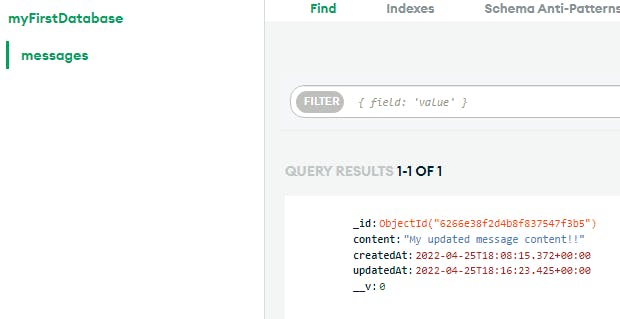
To see our live changes, lets navigate to our database collection going back to our cluster options in the mongoDB Atlas website and clicking on the browse collections option, which will show us our collection:

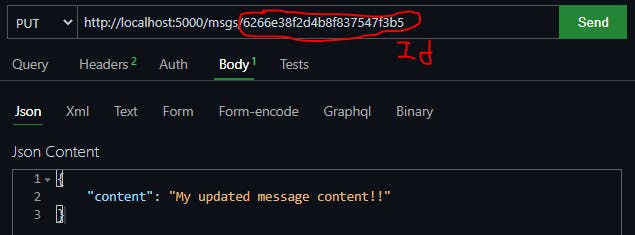
PUT request
Now that we have an existing model inside our messages collection, we can add as much as we want. Now, we'll edit an existing message like below:
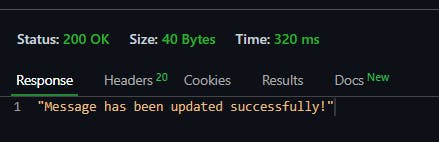
The response we'll get back would look something like this:
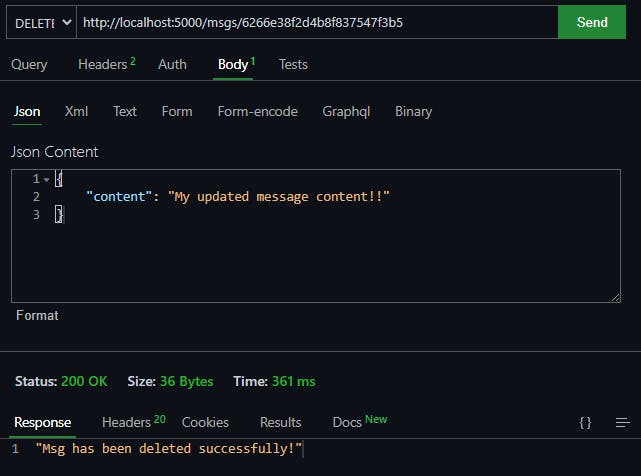
Delete request
Now we're going to delete an existing model from our collection by adding its unique ID to the request params (similar to what we did above for the PUT request). The process will look something like below:
Final Thoughts
Throughout this series, we've learned how to create a simple RESTful API from scratch, tested it locally, and the integrated it with mongoDB to simulate CRUD operations in our platform. Knowing how to properly use a RESTful API is definitely a huge asset to add in your skill-set. Download Full project by clonning/downloading this repo.
I'm constantly writing new blog posts where I share my expertise & skills in topics related to web development. If you're interested in such topics to boost your development career, consider following me! 😇 Or visit my personal website!
Thanks for reading, Ciao! 👋